ADV Motorcycle Lighting: Improving Visibility
Visibility on an ADV motorcycle is crucial, especially when tackling challenging terrains and unpredictable conditions. Upgrading your motorcycle's lighting system can significantly enhance your safety and confidence on the road. This article dives deep into the world of ADV motorcycle lighting, exploring various options, installation tips, and product recommendations to help you choose the best setup for your needs. We'll cover everything from auxiliary lights and headlight upgrades to conspicuity enhancements, ensuring you're seen and can see clearly, no matter where your adventures take you.
Riding an adventure motorcycle often means encountering diverse and sometimes hazardous conditions. From dusty trails to foggy mountain passes, visibility can be severely compromised. Investing in a robust lighting system isn't just about aesthetics; it's about prioritizing your safety and ensuring you can react effectively to potential hazards. This guide will walk you through the essentials of ADV motorcycle lighting, helping you make informed decisions to enhance your riding experience.
Understanding the Importance of Auxiliary Lights for ADV Riding and Enhanced Safety
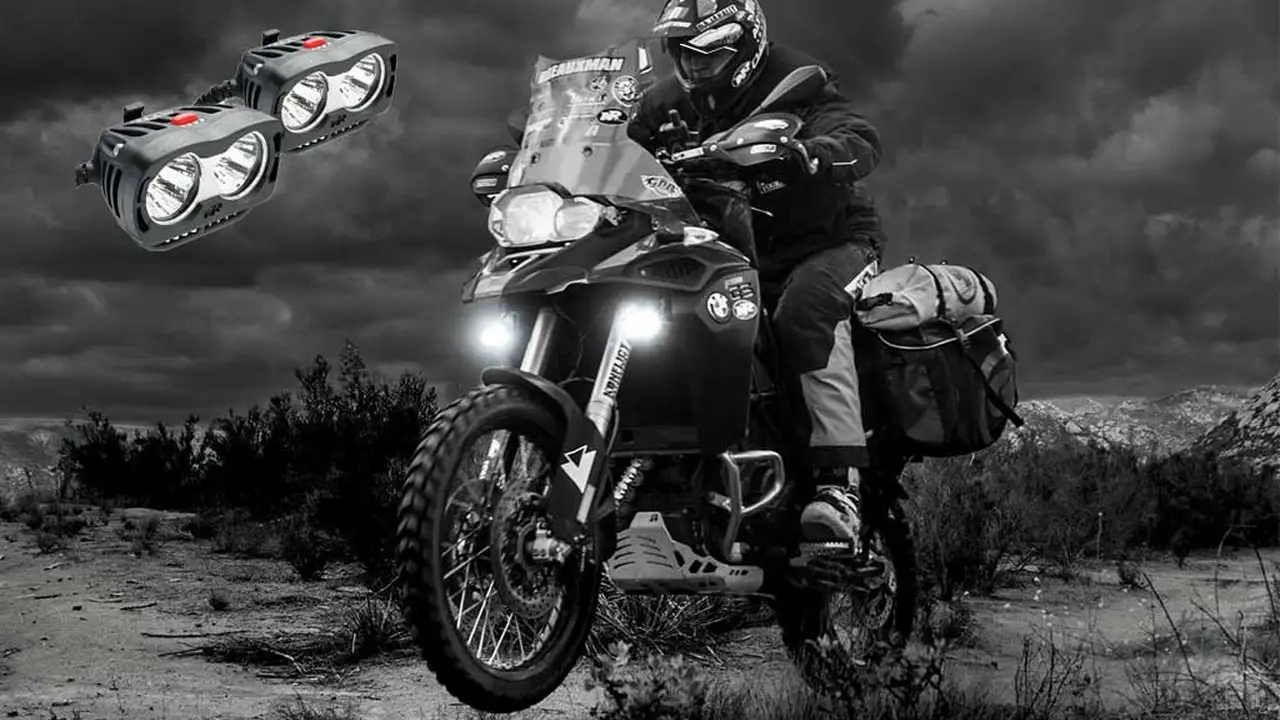
Auxiliary lights are a game-changer for ADV riders. They provide a wider and brighter beam than your stock headlight, illuminating the road ahead and to the sides. This is especially beneficial when navigating twisty roads, encountering wildlife, or riding in low-light conditions. Think of them as extra eyes, giving you a clearer picture of your surroundings.
The advantages of auxiliary lights extend beyond just seeing better. They also make you more visible to other drivers, increasing your chances of being seen in traffic. This is particularly important at dawn, dusk, and in adverse weather conditions.
Choosing the Right Type of Auxiliary Lights: LED vs Halogen vs HID and their Performance
When it comes to auxiliary lights, you have several options: LED, halogen, and HID. Each type has its pros and cons, so let's break them down:
- LED (Light Emitting Diode): LEDs are the most popular choice for ADV riders due to their long lifespan, low power consumption, and intense brightness. They are also very durable and resistant to vibration, making them ideal for off-road use.
- Halogen: Halogen lights are a more traditional option and are generally less expensive than LEDs. However, they are less efficient, consume more power, and have a shorter lifespan. They also produce more heat.
- HID (High-Intensity Discharge): HID lights are known for their exceptional brightness and wide beam pattern. However, they are more complex to install, require a ballast, and can be more susceptible to damage from vibration. They also take a few seconds to reach full brightness.
For most ADV riders, LED lights are the best choice. They offer the best balance of brightness, efficiency, and durability.
Product Recommendations: Top LED Auxiliary Lights for ADV Motorcycles and Price Comparison
Here are a few recommended LED auxiliary lights for ADV motorcycles, along with their typical prices:
- Denali Electronics D4 LED Light Pods: These are a popular choice for their compact size, powerful output, and versatile mounting options. They feature a DataDim technology, allowing them to be dimmed with your bike's high beam switch. Price: $350-$400 per pair.
- Clearwater Lights Erica LED Lights: Known for their exceptional brightness and quality, Clearwater Lights are a premium option. The Erica lights offer a wide and even beam pattern, making them ideal for both on and off-road riding. Price: $600-$700 per pair.
- Rigid Industries D-Series Pro LED Lights: Rigid Industries is a well-known brand in the off-road lighting industry. The D-Series Pro lights are durable, reliable, and offer excellent performance at a reasonable price. Price: $200-$300 per pair.
- Cyclops Adventure Sports Long Range Optimus LED Lights: These lights are designed for maximum distance, providing a focused beam that cuts through the darkness. They are ideal for riders who frequently ride at night or in remote areas. Price: $250-$350 per pair.
When choosing auxiliary lights, consider your budget, riding style, and the types of conditions you typically encounter.
Installation Tips and Wiring Considerations for Auxiliary Motorcycle Lights
Installing auxiliary lights can be a DIY project, but it's important to do it correctly to avoid electrical problems. Here are a few tips:
- Use a wiring harness: A wiring harness will simplify the installation process and ensure that your lights are properly fused and protected.
- Connect to a switched power source: This will prevent your lights from draining your battery when the bike is off.
- Use waterproof connectors: This will protect your connections from the elements and prevent corrosion.
- Mount the lights securely: Make sure the lights are mounted in a location where they won't be damaged and won't interfere with your steering or suspension.
- Aim the lights properly: Aim the lights so that they don't blind oncoming traffic but still provide adequate illumination.
If you're not comfortable with electrical work, it's best to have a professional install your auxiliary lights.
Headlight Upgrades: Improving Your Stock Headlight's Performance with LED Bulbs or Projector Kits
In addition to auxiliary lights, upgrading your stock headlight can also significantly improve your visibility. LED headlight bulbs are a popular choice, offering a brighter and whiter light than halogen bulbs. Projector kits are another option, providing a more focused and controlled beam pattern.
When choosing a headlight upgrade, make sure it's compatible with your motorcycle's electrical system and that it meets all legal requirements. Look for bulbs with a DOT (Department of Transportation) approval.
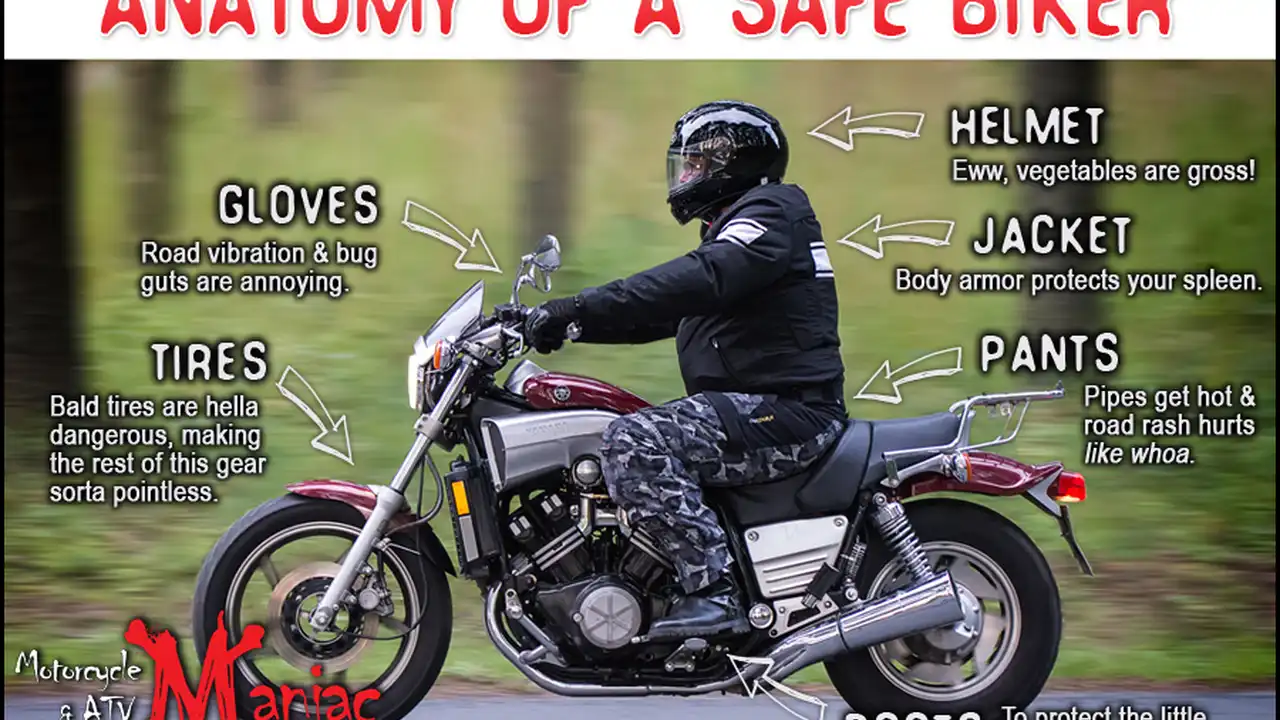
Conspicuity Enhancements: Reflective Gear, Stickers, and High-Visibility Clothing for Increased Rider Safety
While bright lights are important for seeing the road, it's equally important to be seen by other drivers. Conspicuity enhancements can significantly increase your visibility, especially at night and in low-light conditions.
Here are a few ways to enhance your conspicuity:
- Reflective gear: Wear a jacket, pants, and gloves with reflective strips or panels.
- Reflective stickers: Apply reflective stickers to your helmet, luggage, and motorcycle.
- High-visibility clothing: Wear a brightly colored jacket or vest, especially during the day.
- Auxiliary brake lights: Consider adding auxiliary brake lights to your motorcycle to make it more visible to drivers behind you.
By making yourself more visible, you can significantly reduce your risk of accidents.
Specific Product Examples: Exploring Different Brands and Models for Optimal ADV Lighting
Let's delve into some specific product examples to give you a better understanding of what's available:
- Denali Electronics D7 LED Light Pods: Building on the D4, the D7 offers even more light output. They are a great choice for riders who need maximum illumination. Price: $450-$550 per pair.
- Cyclops Adventure Sports Aurora LED Headlight Bulb: This LED bulb is a direct replacement for your stock halogen bulb and offers a significant increase in brightness. Price: $100-$150 per bulb.
- 3M Diamond Grade Reflective Tape: This tape is highly reflective and can be applied to various surfaces to increase your visibility. Price: $20-$30 per roll.
- Klim Badlands Pro A3 Jacket: This jacket is a premium adventure riding jacket with excellent protection, ventilation, and reflectivity. Price: $1000-$1200.
Understanding Beam Patterns: Spot vs Flood vs Combination and their Ideal Use Cases
Auxiliary lights come in different beam patterns: spot, flood, and combination. Each pattern is designed for a specific purpose:
- Spot beam: A spot beam provides a focused, long-range beam of light. It's ideal for riding on open roads or in areas where you need to see far ahead.
- Flood beam: A flood beam provides a wide, diffused beam of light. It's ideal for riding on twisty roads or in areas where you need to see a wider area.
- Combination beam: A combination beam combines the features of both spot and flood beams, providing a balance of long-range and wide-angle illumination.
For most ADV riders, a combination beam is the best choice. It provides a good balance of long-range and wide-angle illumination, making it suitable for a variety of riding conditions.
Maintenance and Troubleshooting: Keeping Your ADV Motorcycle Lights in Top Condition
To ensure that your ADV motorcycle lights are always performing at their best, it's important to perform regular maintenance and troubleshooting. Here are a few tips:
- Check the lights regularly: Make sure all the lights are working properly and that the lenses are clean.
- Clean the lenses: Use a mild soap and water to clean the lenses. Avoid using harsh chemicals or abrasive cleaners.
- Inspect the wiring: Check the wiring for any signs of damage or corrosion.
- Replace bulbs as needed: If a bulb burns out, replace it immediately.
- Tighten connections: Make sure all the connections are tight and secure.
By following these tips, you can keep your ADV motorcycle lights in top condition and ensure that they are always ready to perform when you need them.
:max_bytes(150000):strip_icc()/277019-baked-pork-chops-with-cream-of-mushroom-soup-DDMFS-beauty-4x3-BG-7505-5762b731cf30447d9cbbbbbf387beafa.jpg)